Application minimum required SDK version - 8
Contents
- Preface
- When should ArrayAdapter<T> be used?
- Using ArrayApater<T> default implementation in practice
- Conclusion
- Links
1. Preface
For this article to be useful, basic knowledge about Adapter objects in Android is required.
Unfortunately, I haven't found an article of the same type in English, that's why I am going to write an overview of Android adapters soon.
In this post I will make a brief overview of the simplest default Android Adapter implementation - ArrayAdapter<T>.
android.widget.ArrayAdapter<T> is a concrete class that can be instantiated with the help of one of the six constructors or using static factory method (Effective Java. Item 1) 2. When should ArrayAdapter<T> be used?
A parameterized class ArrayAdapter<T> is a very simple adapter implementation.
The default implementation is used when you have an array or List of objects of any type and you need to show user their string representation in the form of ListView, Spinner, GridView or any other subclass of AdapterView. For string representation of an object, this adapter will use toString() method.
By default this class expects that the provided resource id references a single TextView. If you want to use a more complex layout, use the constructors that also takes a field id. That field id should reference a TextView in the larger layout resource. (Documentation)3. Using ArrayAdapter<T> in practice
  |
| ListView and Spinner of planets |
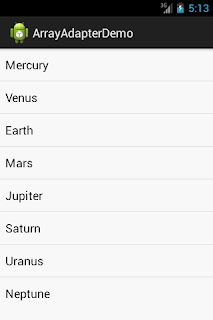
Suppose we need to display a list of planets in our application (As a basis I took the API guide on developer.android.com about Spinner). The simplest case is when the set of data we need to display is predefined (we exactly know how many items we want to show and have their string representation). In this situation our set of data should be defined in the resource file and static factory method createFromResource() should be used.
Create a new project with a blank activity.
First, let's define our data set in res/values/strings.xml resource file:
<?xml version="1.0" encoding="utf-8"?>
<resources>

    <string-array name="planets_array">
        <item>Mercury</item>
        <item>Venus</item>
        <item>Earth</item>
        <item>Mars</item>
        <item>Jupiter</item>
        <item>Saturn</item>
        <item>Uranus</item>
        <item>Neptune</item>
    </string-array>

</resources>
Now let's create a layout file (res/layout/activity_planets.xml) which contains a single ListView:<LinearLayout xmlns:android="http://schemas.android.com/apk/res/android"
xmlns:tools="http://schemas.android.com/tools"
android:layout_width="match_parent"
android:layout_height="match_parent"
android:orientation="vertical" >
<ListView
android:id="@+id/listViewPlanets"
android:layout_width="match_parent"
android:layout_height="wrap_content" >
</ListView>
</LinearLayout>
And finally our PlanetsActivity.java :package com.blogspot.android_by_example;
import android.os.Bundle;
import android.app.Activity;
import android.widget.ArrayAdapter;
import android.widget.ListView;
public class PlanetsActivity extends Activity {
@Override
protected void onCreate(Bundle savedInstanceState) {
super.onCreate(savedInstanceState);
setContentView(R.layout.activity_planets);
ListView listViewContacts = (ListView) findViewById(R.id.listViewPlanets);
ArrayAdapter<CharSequence> adapter = ArrayAdapter.createFromResource(
this, // context
R.array.planets_array, // source of data
android.R.layout.simple_list_item_1); // layout file to make views
listViewContacts.setAdapter(adapter);
}
}
And don't forget to include the activity into your AndroidManifest.xml file.
That's the whole code for creating a simple list of items. In this case the created adapter takes the array of data declared in the resource file and builds each item in the list using the default layout for the Android list item.
The same result can be achieved by using constructor. It accepts array of objects (T[]) as in the code above or it can receive a List<T> of objects. In our case the code gets a little bit more verbose because of fetching the array from application resources. Note that in the code below the constructor receives a List of Strings.package com.blogspot.android_by_example;
import java.util.Arrays;
import android.os.Bundle;
import android.app.Activity;
import android.widget.ArrayAdapter;
import android.widget.ListView;
public class PlanetsActivity extends Activity {
@Override
protected void onCreate(Bundle savedInstanceState) {
super.onCreate(savedInstanceState);
setContentView(R.layout.activity_planets);
ListView listViewContacts = (ListView) findViewById(R.id.listViewPlanets);
String[] planets = getResources().getStringArray(R.array.planets_array);
ArrayAdapter<String> adapter = new ArrayAdapter<String>(
this, android.R.layout.simple_list_item_1, Arrays.asList(planets));
listViewContacts.setAdapter(adapter);
}
}
Note that in this example ListView can be substituted by any AdapterView (Spinner, GridView)4. Conclusion
- ArrayAdapter<T> is a concrete class. It should be used when we need a string representation of data in array or List is required. You can subclass it if the default implementation lacks functionality.
- To instantiate an ArrayAdapter<T> object one of the constructors can be used. Or you can use static factory method createFromResource(), when data set is in the application resource file. In each case you have to provide ArrayAdapter<T> an object with the data set for string representation and a layout file for making a View
- We've developed the most simple application that shows a list of planets using ArrayAdapter<T>.


